A note about links: If we include links to retail sites like Amazon or elsewhere, it's because we either use the items ourselves in our own shop or they're relevant to the topic. As an Amazon Associate we earn from qualifying purchases.
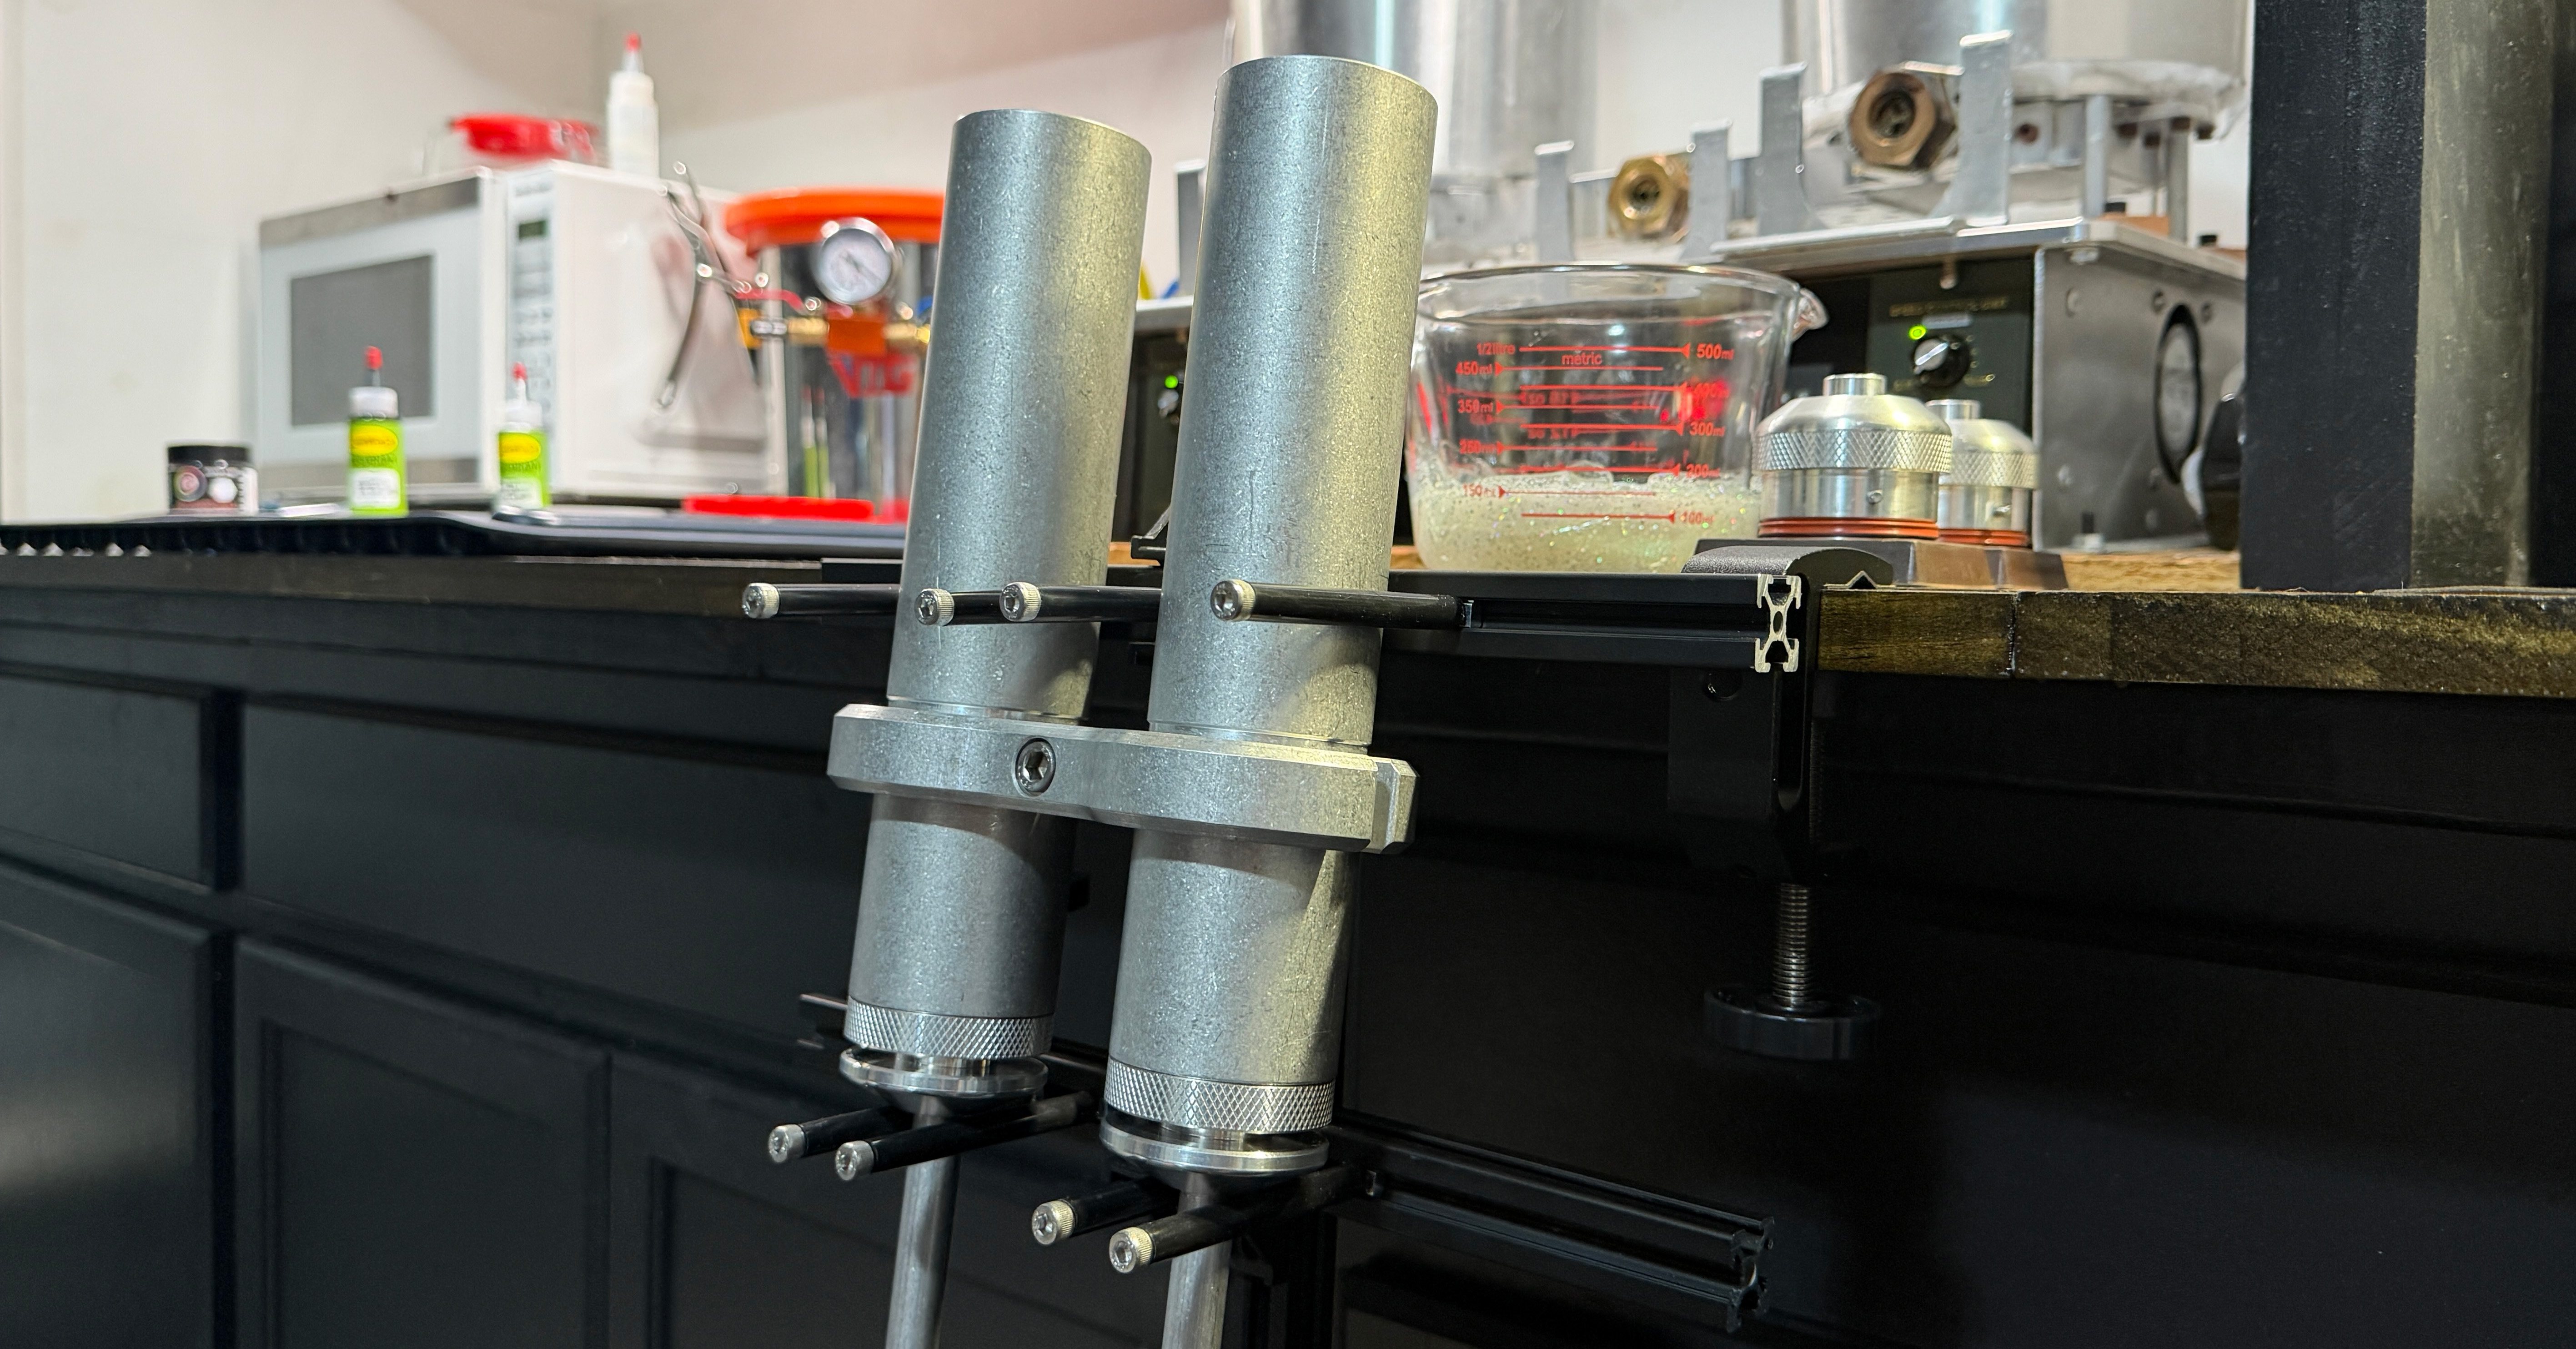
The Crossbow is a rugged, bench-mounted inverted injector holder and filling station that lets you fill from the top, nice and clean. See exactly how much plastic you’re pouring in, avoid the dreaded cup-slurp that introduces unwanted air into your plastic, and shoot molds without dripping and dragging hot plastic all over your work area.
Why “Crossbow”? Well, it kind of looks like a crossbow if you squint and look at it just right.
It’s tough, fully adjustable to fit your preferred injector brand and style, and made 100% from materials that can handle the heat. It works for single and dual injector systems (triple with some simple mods), gives you a little extra safety, and mounts to just about any bench or work table.
Why I built it
When I’m doing test or smaller batches from glass cups, I like to pour plastic into the injector barrels from the top (for a few reasons listed below), so I needed a safe way to mount my injectors inverted, with the open barrels facing up at a height where I can easily see into them and pour. The Crossbow lets me do just that.
Using the Crossbow means I’m not inadvertently slurping up extra air as I draw down plastic in the cups. It mounts at a convenient working height, so I can see exactly how much plastic I’m adding, and things tend to stay much cleaner while shooting. I can’t explain it, but doing it this way just feels nicer.
The Crossbow also gives me a safe and secure place to rest hot injectors both before and after shooting. Before, so I’m not fumbling around with them right after they come out of the toaster oven while I’m also trying to pour plastic in or attach a nozzle. And after, so I’m not cluttering up my work space or bench top with those same hot injectors.
There is the extra step of inserting the nozzles when shooting this way, but that takes about five seconds, and I find warming the nozzles separately is actually a benefit. A nozzle sitting on its own next to the injector in the toaster oven gets more direct heat on its inside face. This method isn’t for everyone (to each their own), but I’ve come to prefer it. The Crossbow simply makes this method easier, faster, safer, and honestly more fun.
How I use it
I’m being ultra detailed here, so if you decide to build or buy a Crossbow for yourself, you’ll be set up for success the first time you use it. This list may look long, but in reality the whole process takes under 15 seconds. I’ve timed it several times.
- Pull the injector(s) out of the toaster oven, or wherever you warm them prior to shooting. I keep the injectors and nozzles separated and warm them in the oven. Keeping them separate means more surface area for warming and helps ensure your nozzle is nice and toasty.
- Place the injectors on the Crossbow rack, inverted, with the plungers extended enough to accommodate the amount of plastic you intend to add. You can always opt to extend them fully, then just burp out any excess air before shooting. It’s easy with the Crossbow since the air always stays on top.
- Pour your plastic in directly from your cups. I tend to pour down the side of the barrel to reduce the chances of accidentally adding air bubbles.
- Insert your nozzles. I keep mine in the toaster oven or on my silicone warming mat right up until it’s time to insert them. Stick ’em in and lock them in place.
- Make sure to clear any air before shooting. I simply pick my injector up and burp it into a trash can I have next to me, keeping the nozzle tipped up at about a 45-degree angle so the air stays at the top. This is a step you don’t want to skip. Hot air expands, and if it makes its way to the back of your injector before shooting, you’ve just turned your injector into a pressure gun.
- Shoot clean.
How we got here
Maybe it’s just me, but I don’t like the whole dip-your-injectors-in-a-cup-and-slather-them-with-hot-plastic thing. I know others love it, and that’s fantastic. More power to those folks… Do what works for you. My personal preference for cleaner shooting and a tidier work space led me down a rabbit hole, and the Crossbow is the result. This thing went through too many iterations, designs, and form factors to count, and I spent way more hours in the garage getting here than my wife would prefer, but I love it and it works for me. It has now become the centerpiece of my workflow, and I hope it’ll be useful to you if you decide to build or buy one yourself!
Build your own
Everything you need can be purchased from Amazon if you don’t already have it on hand in your shop or garage.
Parts
- 2040 aluminum extrusion, 1 piece, 400mm (about 15.75”). This 2-pack is what I use.
- 2020 aluminum extrusion, 2 pieces, 300mm (about 11.8”). This 4-pack is what I use.
- 2020 corner brackets, 8 (four per horizontal bar, mounting the 2020 bars to the vertical 2040), plus 16 of the short black M5 x 8mm screws that come with them, two per bracket. I use this 30-piece set. It comes with 30 brackets, 60 T-nuts with screws, and 60 washers, so you’ll have plenty left over.
- M5 T-nuts, 28, all from the same bracket set: 16 for the corner brackets, 10 for the long bolts that form the arms around the injectors and hold the mending plates, and 2 for the clamp adapters.
- Aluminum C-clamps, 2. I use this 2-pack. They’ll fit any bench or table top between 1/2” and 1.5” thick.
- M5 x 80mm socket head screws, 10 for two injectors: stainless steel. Eight of them make the brackets that hold the injectors in the Crossbow (wrapped with the silicone tubing), and two make the stabilizer at the bottom that holds the plunger shaft and handles. For a triple injector system, you’d need 14, plus longer mending plates. I use this 30-set kit, which comes with a matching nut, flat washer, and split washer for each screw.
- M5 x 50mm socket head screws, 2: the short bolts by the plunger handles, from this M5 assortment kit (stainless, 30mm to 50mm screws with matching nuts and washers).
- M5 nuts, flat washers, and split washers: 6 nuts, 4 flat, 4 split. Between the two screw kits, you’ll have plenty of each.
- Slotted flat mending plates, 2: black stainless steel, 110mm (about 4.33”) long with a 90mm slot. Used together, they form the wide bottom bracket that the plunger shaft rests against (with the handles resting below), which keeps the injectors securely in place and adds stability. I use this 6-pack.
- Black silicone tubing, about 3 feet: 3/16” inside diameter, 5/16” outside. It covers all twelve bolts (the eight arm bolts plus the four on the plunger rod support) for heat and scratch protection. I use this 10-foot roll.
- Self-fusing silicone tape, black, 1.5” wide (optional). Wrap the extrusion with it wherever you want extra grip, or scratch or heat protection for the injectors. It only sticks to itself, so it comes off clean. I use this roll all over the shop.
- 1/4”-20 male to M5 male screw adapters, 2, to mount the clamps to the extrusion: the 1/4” end threads into the clamp and the M5 end into a T-nut. The ones I used aren’t available anymore, but this 2-pack is the same size. Whatever you buy, make sure it’s 1/4” male to M5 male, or use a different mounting bracket system that works with 2020 extrusion.
Tools
- Hex wrenches, 3mm and 4mm. The 3mm fits all the screws that go into the corner brackets, and the 4mm fits the long bolts that form the arms. I use this fancy hex bit set (it has both sizes) with my trusty 20-year-old Stanley ratcheting screwdriver, because I can’t stand how slow, tedious, and clunky old-school hex wrenches are.
- An 8mm wrench (or a small pair of pliers) for the nuts on the plunger rod support.
- A tape measure or ruler and a pencil for the measurements and center marks.
- Sharp scissors or a straight razor blade for cutting the silicone tubing.
Assembly
Prep your materials
- Gather the frame parts. From the 30-piece corner bracket set, grab 8 corner brackets, 16 T-nuts, and 16 screws. You’ll also need your two 2020 bars and the 2040 bar.
- Mark the centers. Measure and mark the center point on each 2020 bar. These become your crossbars, and the marks let you line them up on center against the 2040.
- Cut the silicone tubing. Grab your silicone tubing and some sharp scissors or a straight razor blade. Cut off eight 3-inch pieces, two 2.5-inch pieces, and two 1.5-inch pieces of the tube. The 3-inch pieces go on the eight long arm bolts, the 2.5-inch pieces on the two bolts that mount the plunger rod support, and the 1.5-inch pieces on the two short bolts by the plunger handles.
The top crossbar
- Load the 2040. Slide two T-nuts into each of the two front slots of the 2040: one down to 2.5 inches from the top, and one close to the top.
- Mount the lower brackets. Attach a corner bracket to each T-nut at 2.5 inches, flat side facing up, with one screw each. Don’t tighten them too much, because you’ll want to be able to adjust them later.
- Load a 2020 bar. Slide two T-nuts into one face of a 2020 bar and two more into the opposite face, with each pair roughly centered.
- Set the crossbar on the lower brackets. Turn the 2020 so one of those faces sits on the flat tops of the brackets. Line up a T-nut with each bracket’s screw hole, center the bar using its center mark, and screw it to the brackets.
- Add the upper brackets. Grab two more corner brackets and flip them so the flat side faces down onto the top of the 2020. Line each one up with a T-nut near the top of the 2040 and a T-nut on top of the 2020, then screw them in. The crossbar is now held in place top and bottom. Make sure everything is centered and that the tops of the upper brackets are flush-ish with the top of the 2040.
- Tighten everything with your 3mm hex wrench so it’s secure and there’s no wiggle.
The middle crossbar
- Load the bottom of the 2040. Slide two more T-nuts into each of the two front slots of the 2040, this time from the bottom. For N2 Series 2 injectors, position the top two about 4 inches below the bottom of the top crossbar you just installed, and the bottom two about 2 more inches down, so they line up with the next set of corner brackets.
- Mount the upper brackets. Attach two corner brackets, flat side down, to the top set of T-nuts. Leave them a little loose for now.
- Load the second 2020 bar. Slide two T-nuts into one face of the 2020 bar and two more into the opposite face, with each pair roughly centered.
- Set the crossbar under the brackets. Turn the 2020 so one of the faces with T-nuts presses up against the flat undersides of the brackets. Line up a T-nut with each bracket’s screw hole, center the bar using its center mark, and screw it to the brackets.
- Add the lower brackets, but don’t tighten them yet. Grab two more corner brackets and flip them so the flat side faces up against the bottom of the 2020. Line each one up with a T-nut in the 2040 and a T-nut on the bottom of the 2020, then screw them in. The crossbar is now held in place top and bottom. Make sure everything is centered.
- Set the spacing for your injectors. This is where you’ll want to assess your injector size and adjust the distance between the top crossbar and this middle crossbar. For my N2 Series 2 injectors, the sweet spot is a 4.5-inch gap between the top bar and this bar. If your injectors are longer, you may want to add an inch or more to that. You’ll likely have to play with this and the position of the support arms (below) to get things just right for your particular injectors.
- Tighten everything with your 3mm hex wrench so it’s secure and there’s no wiggle.
The plunger rod support
- Load the bottom of the 2040 again. Slide two more T-nuts into the bottom of the 2040, one in each channel. For N2 Series 2 injectors, position them about 6.5 inches from the bottom of the middle crossbar.
- Stack the mending plates. Here’s where things start to get tricky. Place two of the flat mending plates one on top of the other so the center slots line up, then feed two of the 80mm socket head screws through both.
- Add the washers and nuts. Working only on one side of this assembly, put a split washer on each screw, then follow each with a nut. Screw each nut all the way down so it’s firm but not overly tight against the mending plates. Don’t tighten them yet, because you’ll need to slide the plates apart once the bolts are mounted to the 2040.
- Add the silicone tubes. Slide one of the 2.5-inch silicone tubes you cut earlier over each screw so it rests against the nut. The tube will likely come very close to the end of the screw. That’s by design, so the silicone is nice and snug once the bolts are in.
- Mount the bar. Screw each bolt into one of the T-nuts you added in step 1, until the silicone is nice and snug.
- Spread the plates. Here’s where things get even more tricky. Pull one mending plate left and the other right, so each one’s inner end hugs the bolts. Now, with your 8mm wrench (or pliers), tighten the nuts up against the mending plates so each is good and secure. The two plates now work in tandem as one long bar, fortified in the middle where they overlap and connect to the bolts.
- Prep the short bolts. Slide one of the 1.5-inch silicone tubes over each of the two 50mm bolts so it fits snug against the head of the bolt. Then thread a nut onto each bolt and tighten it so it sits firm against the other end of the tube. That holds the silicone in place and leaves about half an inch of thread exposed.
- Mount the first short bolt. Put a flat washer on one of the bolts, then feed the exposed end through one of the mending plates. On the other side, add another flat washer, then a split washer, followed by another nut. Tighten it so the bolt stays in place, but not so tight that you can’t adjust it when you fit your injectors to the Crossbow later on.
- Mount the second short bolt. Repeat step 8 with the other 50mm bolt on the other mending plate.
The support arms
Add the support arms last, after the crossbars and the plunger rod support are in, so you can gauge where the arms should go to fit your particular injectors. I’m spec’ing this out for N2 Series 2 injectors. For other injectors, you’ll likely need to make adjustments as you add your arms, so rough everything in and keep the arms a little loose until you’ve fine-tuned their positions.
- Load the crossbars. For a dual injector (or two single injectors), slide four T-nuts into the front of each crossbar.
- Rough in the arms. On each crossbar, loosely screw an 80mm socket head screw, wrapped in one of your 3-inch silicone tubes, into each of the four T-nuts. Set the inner two right next to each other, dead center, and push the outer two out toward the ends of the crossbar.
- Place your injectors. With the plunger rods extended, set two single injectors on either side of center, or center a dual system along the 2040. The end plate of each injector (where the plunger comes out) should ride just above the middle crossbar.
- Adjust all the arms to fit your injector(s). On the top crossbar, slide the inner arms out and the outer arms in, until they rest loosely against the injector barrels. On the middle crossbar, do the same, but have the arms rest against the plunger rods with the barrels resting on top. On the plunger rod support, slide the two small arms in as needed so they rest against the outside of the plunger handles.
- Leave a little wiggle room. Give yourself a millimeter or two, so you can easily pop the injectors in and out of the Crossbow to rack and unrack them.
- Lock in all the arms. Once you’re happy with how your injectors fit within the support arms, tighten all the arms in place with your 4mm hex wrench.
The clamps
Depending on how you work and your shop setup, you may want to go a different mounting route than I did. I custom built my bench so it’s deep enough to give me plenty of edge to mount things like this to, without interfering too much with what’s in the cabinets underneath.
For my mounts, I went with two very sturdy, strong C-clamps. They’ll fit on any table edge or plywood between 1/2 and 1.5 inches thick. They’re really meant for rigging photography and lighting equipment, so they come with standard 1/4”-20 and 3/8”-16 threaded holes, which makes it easy to find adapters. I couldn’t find anything with M5 threads to fit the extrusion hardware natively, but I could find 1/4”-20 to M5 thread adapters, so that’s what I went with instead.
I find this setup super convenient, since I can move my Crossbows around the shop as needed and attach them to my bench or any table I want.
- Load the top crossbar. Slide a T-nut into the back of each end of the top crossbar, so each one sits 1/2 to 1 inch in from the end.
- Add the adapters. Screw the M5 end of a 1/4” to M5 adapter into each T-nut, so it’s nice and tight and stays put. Be careful not to overtighten: aluminum threads can strip easily!
- Mount the clamps. Screw a clamp onto each adapter using the clamp’s 1/4” hole, until it’s tight and straight.
- Clamp it down. As long as nothing feels loose, you’re ready to mount the clamps to your bench or table and rock out with your Crossbow.
Fits
It’s confirmed to fit N2 Series 2 single and dual injectors, but since the track mount system is fully adjustable for width and height, it should fit just about any injector brand or model you want to throw at it. All you’d need to do is loosen some screws and adjust the brackets and arms so they fit your particular injectors. The adjustable mounting arms are what let it accept and support virtually any injector. They’re designed to fit under the injector’s top plate, allowing only the plunger to pass through. This keeps the injector firmly in place on three sides, regardless of brand or size.
How to build one yourself
If you want to build one, assuming you don’t have all this stuff lying around your garage and will be sourcing from Amazon, you’ll pretty much have enough components to build two with how the materials are packaged. As of November 2026, the core materials will run you about $130. You’ll get almost everything you need to build two, minus the C-clamps and clamp adapters to mount it to a work top. The total for building two will be around $150, including those additional parts.
Build two and keep the other one for yourself, or gift it to a bait-making friend!
If you don’t want to spend that much or deal with all that: My daughter will happily package and mail a kit to you for $105. You get one for less than it’ll cost you to source materials from Amazon, and she’ll earn a little gas money. It’s a win-win.
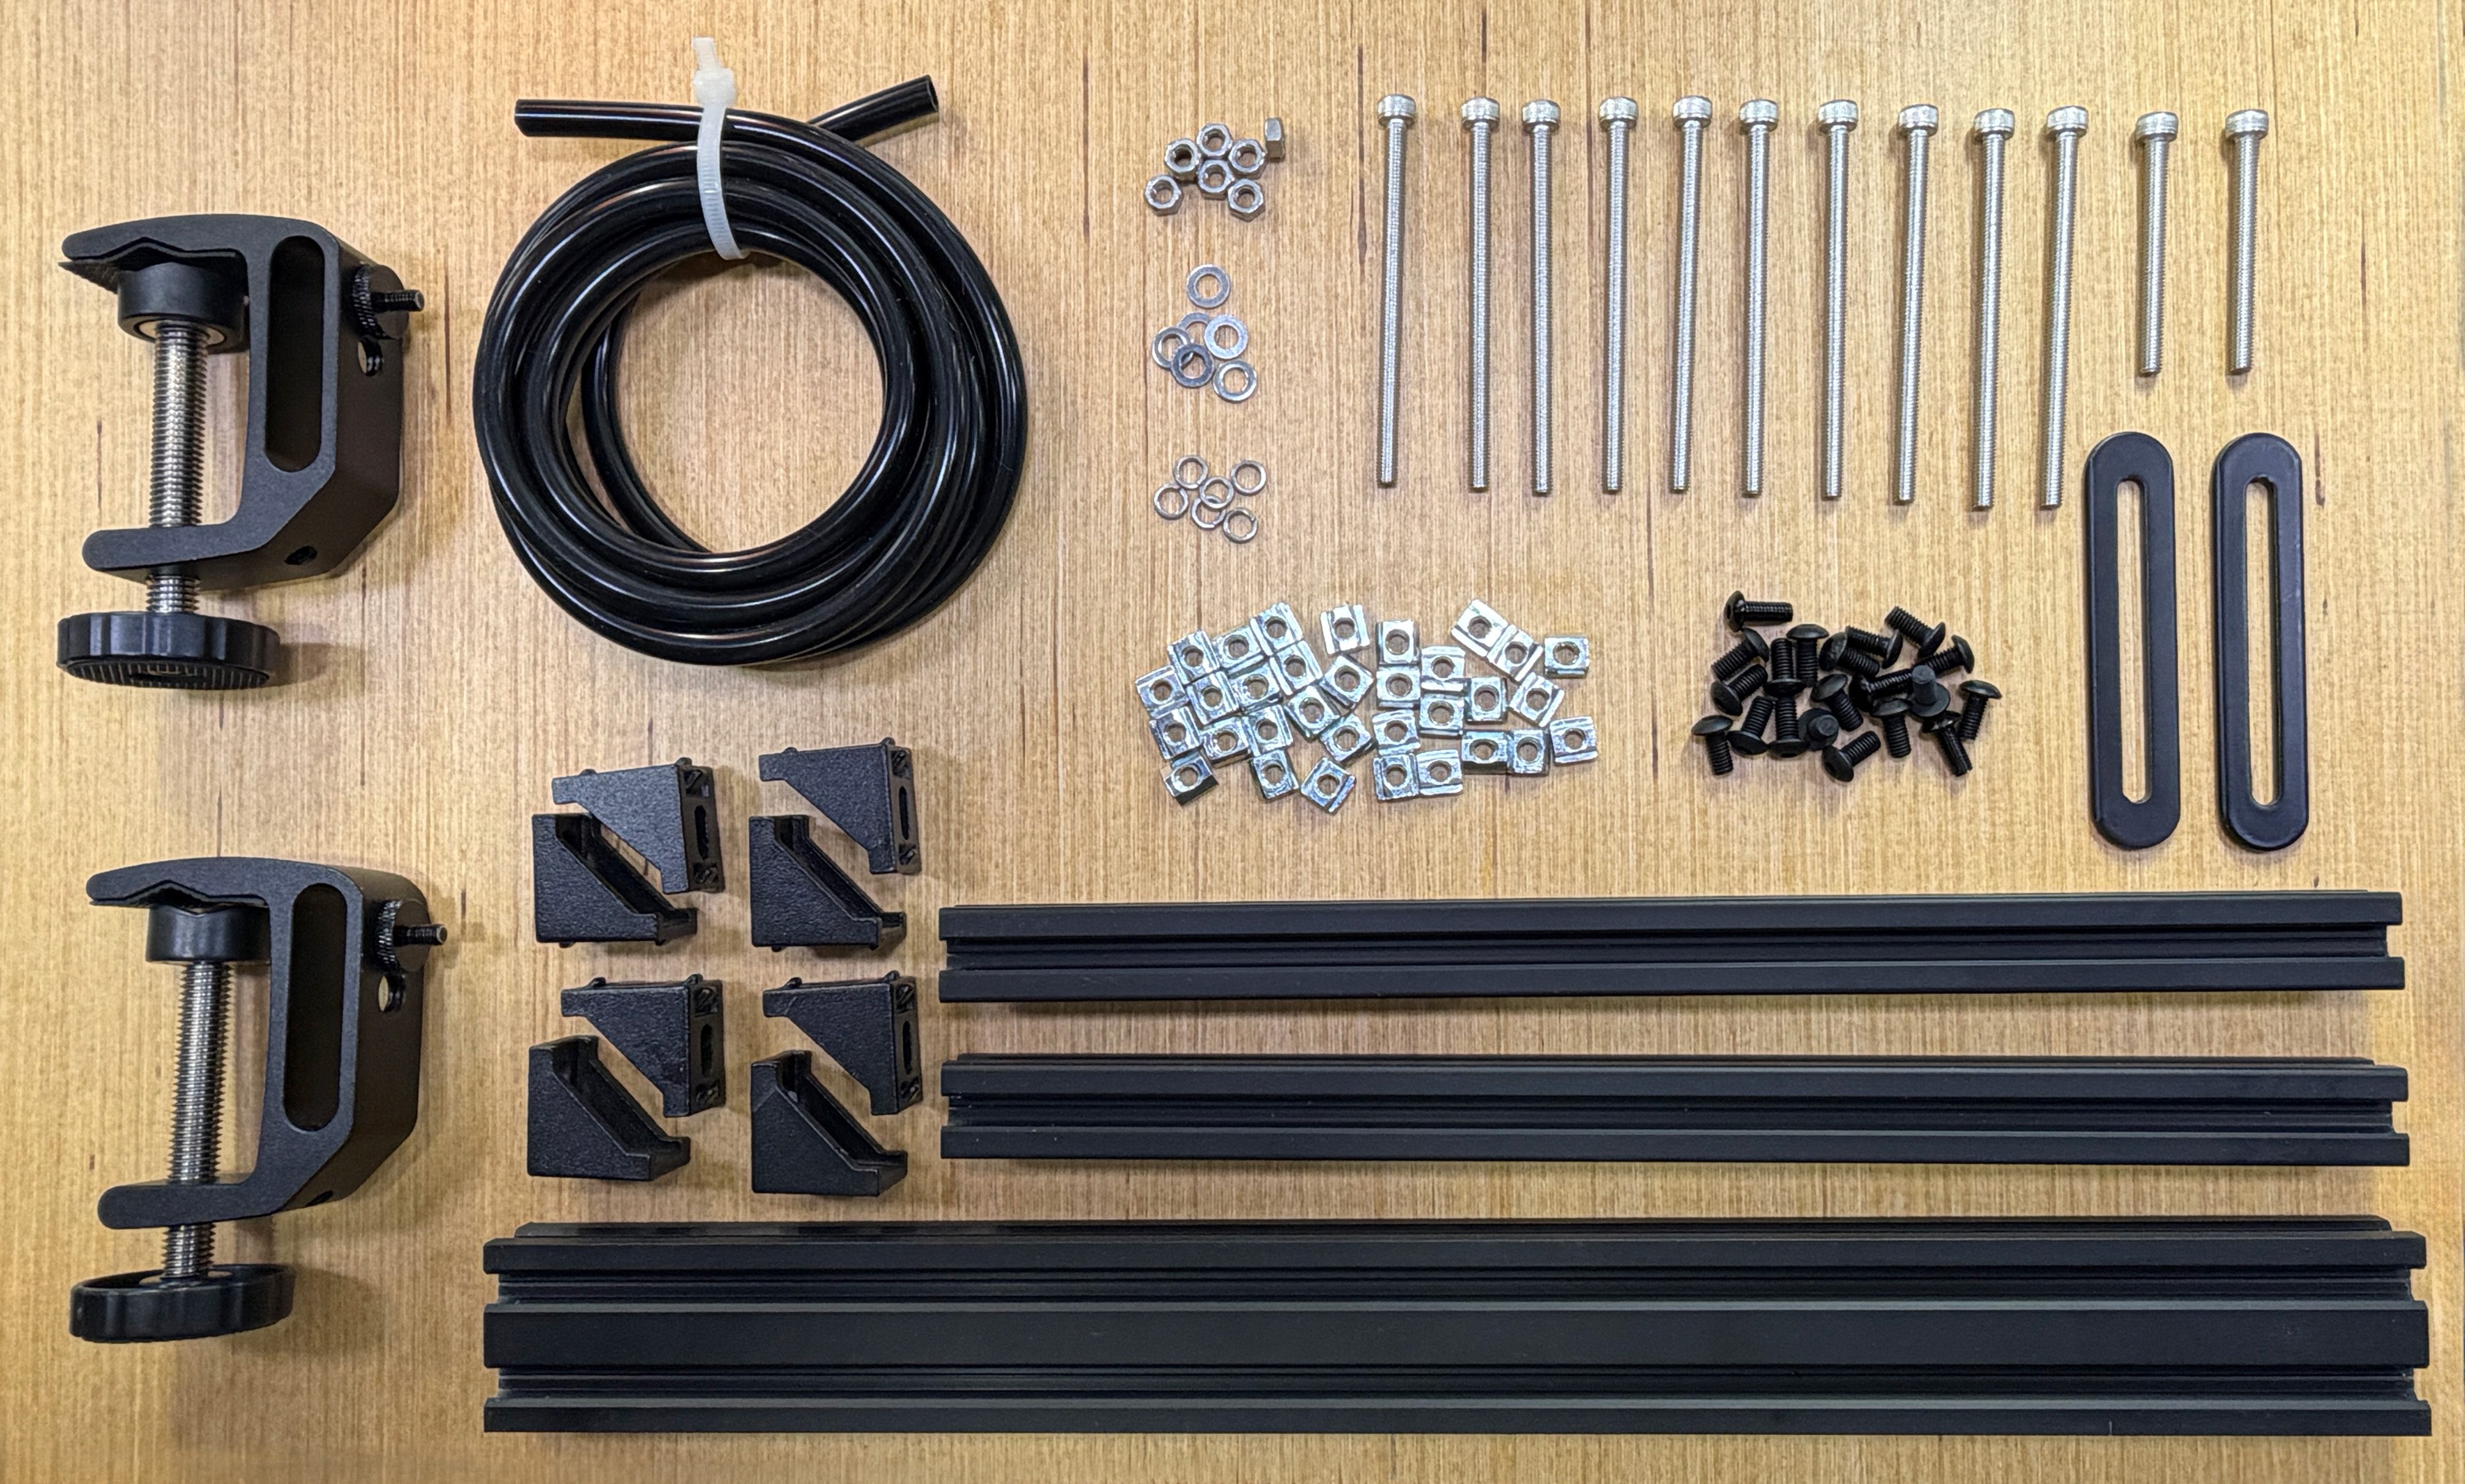
What's in the Crossbow kit
- One 2040 aluminum extrusion, 400mm (about 15.75")
- Two 2020 aluminum extrusions, 300mm (about 11.8")
- Eight 2020 corner brackets, with 16 M5 x 8mm screws
- 28 M5 T-nuts
- 10 M5 x 80mm stainless socket head screws
- 2 M5 x 50mm stainless socket head screws
- M5 nuts and washers: 6 nuts, 4 flat washers, 4 split washers
- 2 slotted mending plates, 110mm
- About 3 feet of black silicone tubing
- 2 aluminum C-clamps
- 2 clamp adapters, 1/4"-20 to M5
- A few extra pieces (screws, bolts, and such)
Not included: Tools, and the optional silicone tape.
Order a Crossbow kit, and we’ll give you a laminated Bait Color Formulation Kit for just $10 more!
Just the Crossbow
Crossbow kit
$105 Shipping included
- All the hardware to build one Crossbow, plus a few extra pieces
- Packed and mailed by my daughter
- Bring your own tools (see the list above)
Save $15
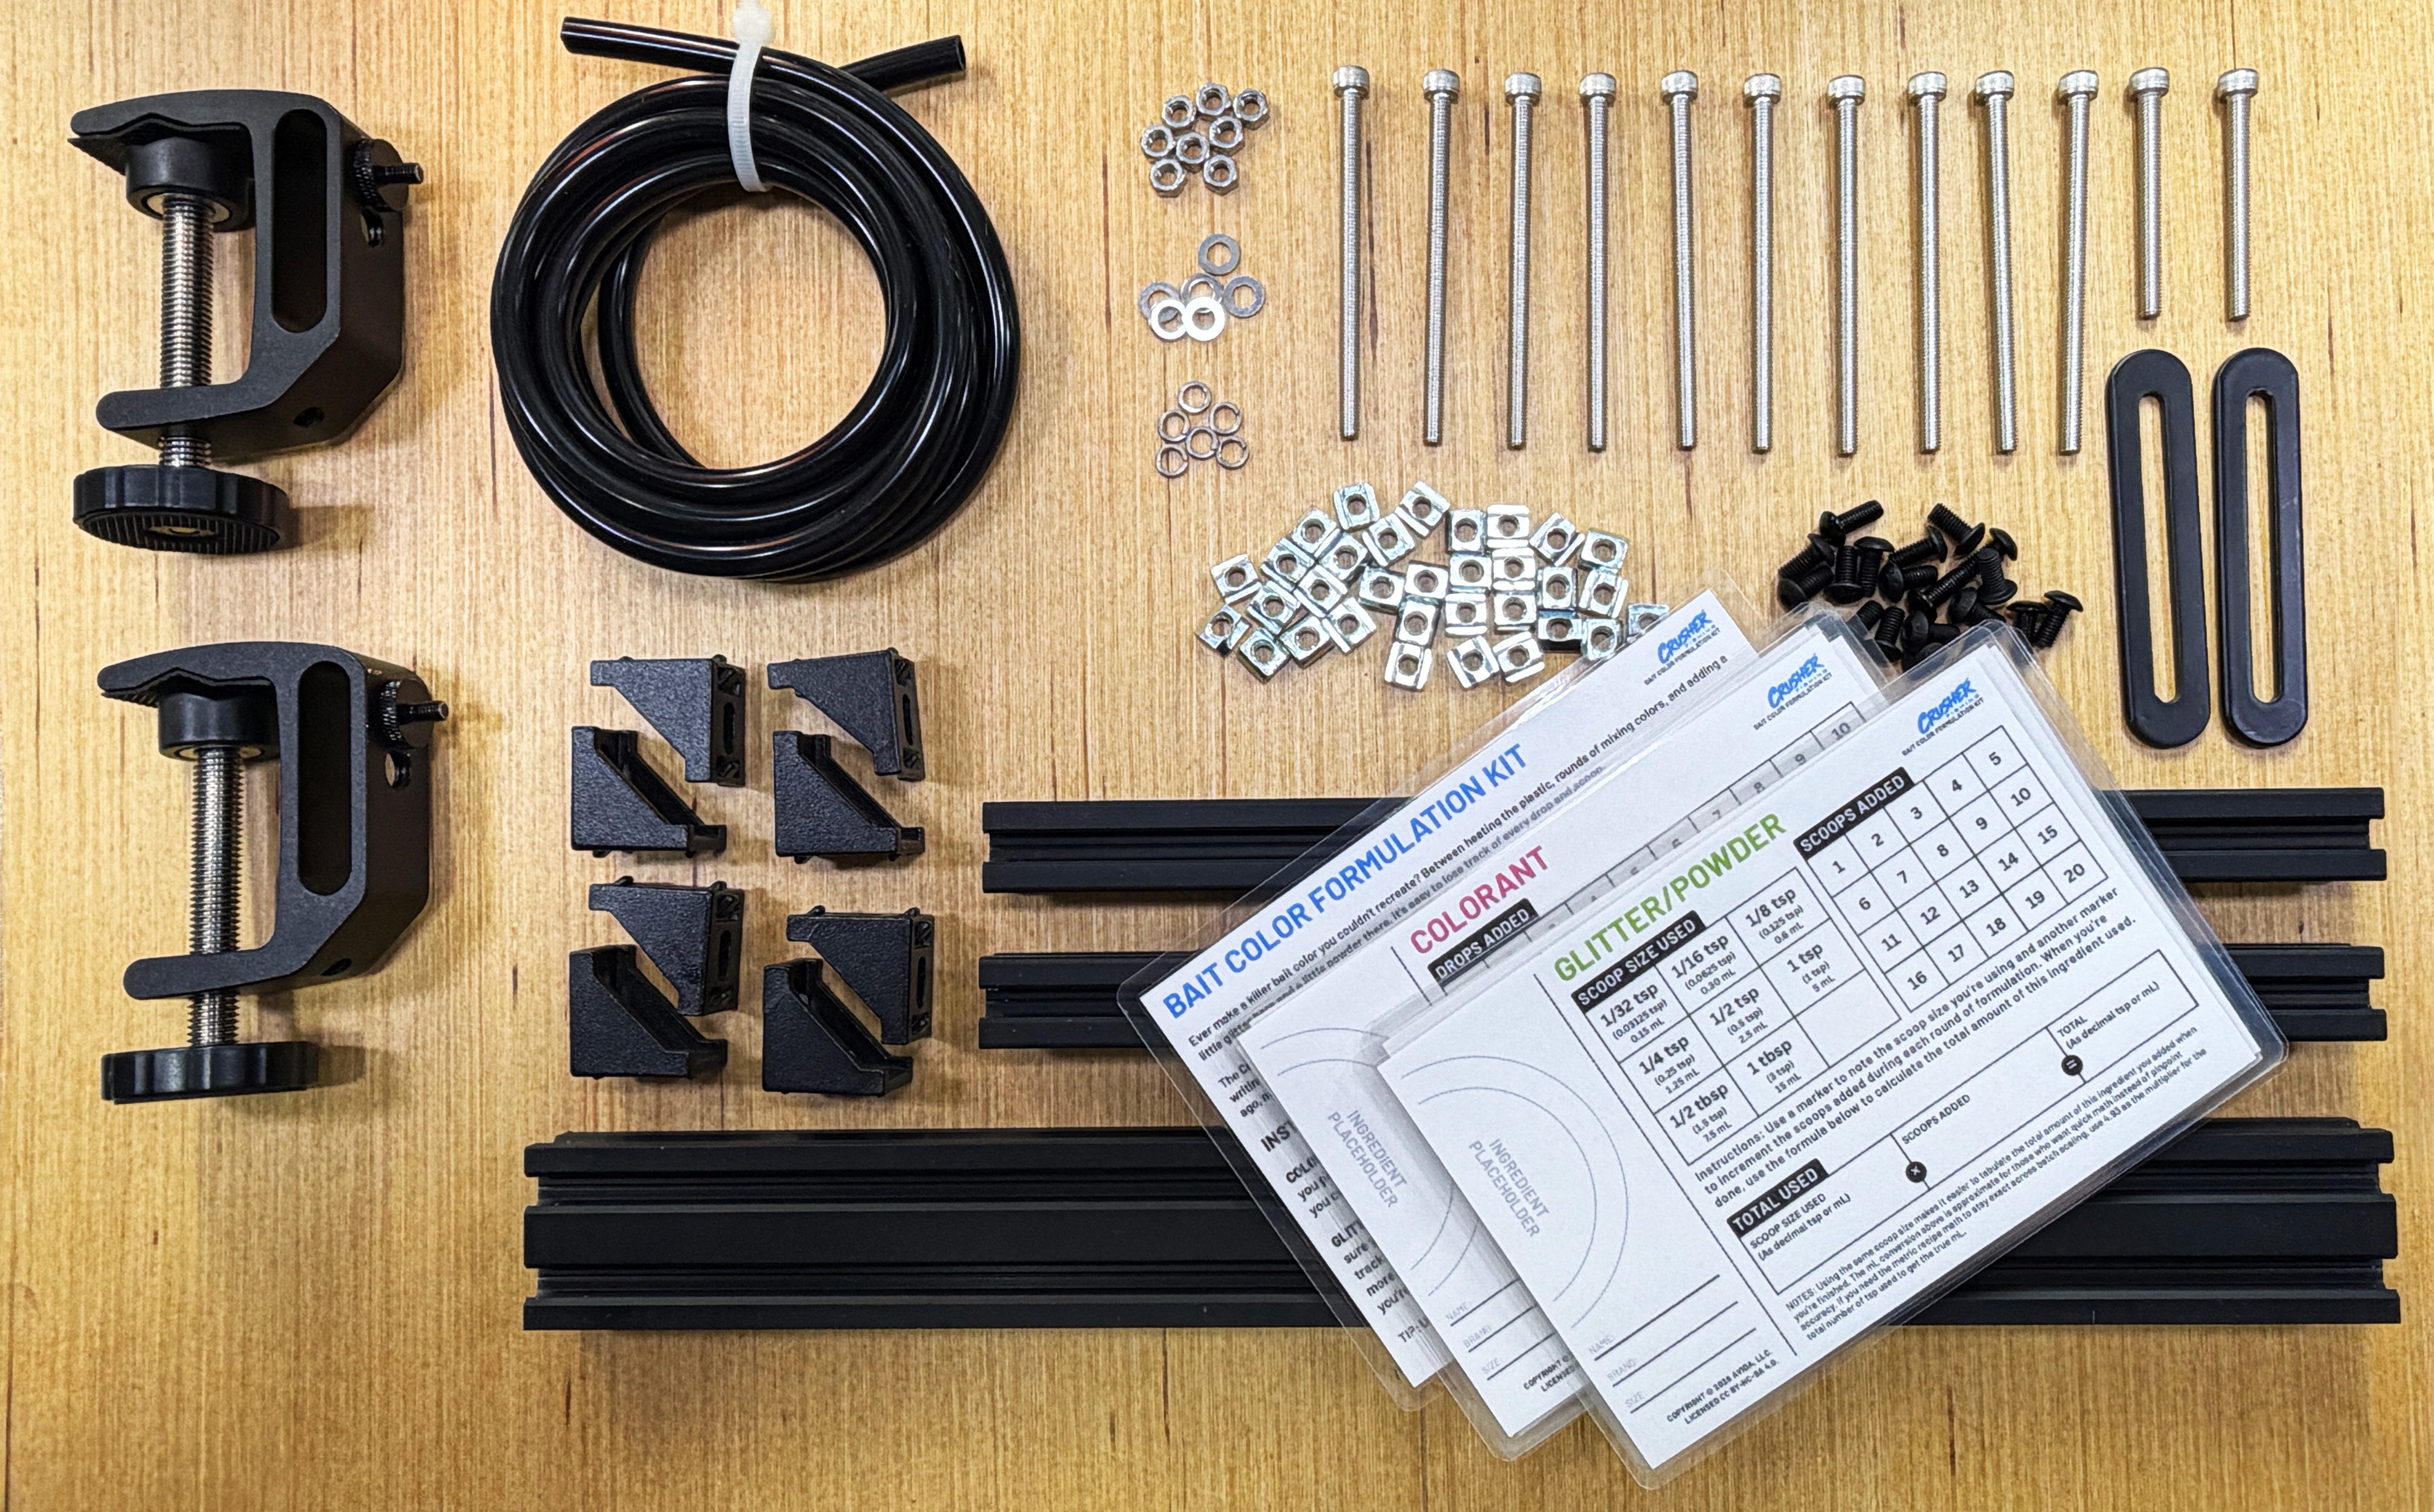
Add the Formulation Kit
Crossbow kit + Bait Color Formulation Kit
$115 Bought separately: $130 Shipping included
- Everything in the Crossbow kit
- The laminated Bait Color Formulation Kit: 6 colorant cards, 6 glitter/powder cards, and an instructions card
- A $25 kit for just $10 more