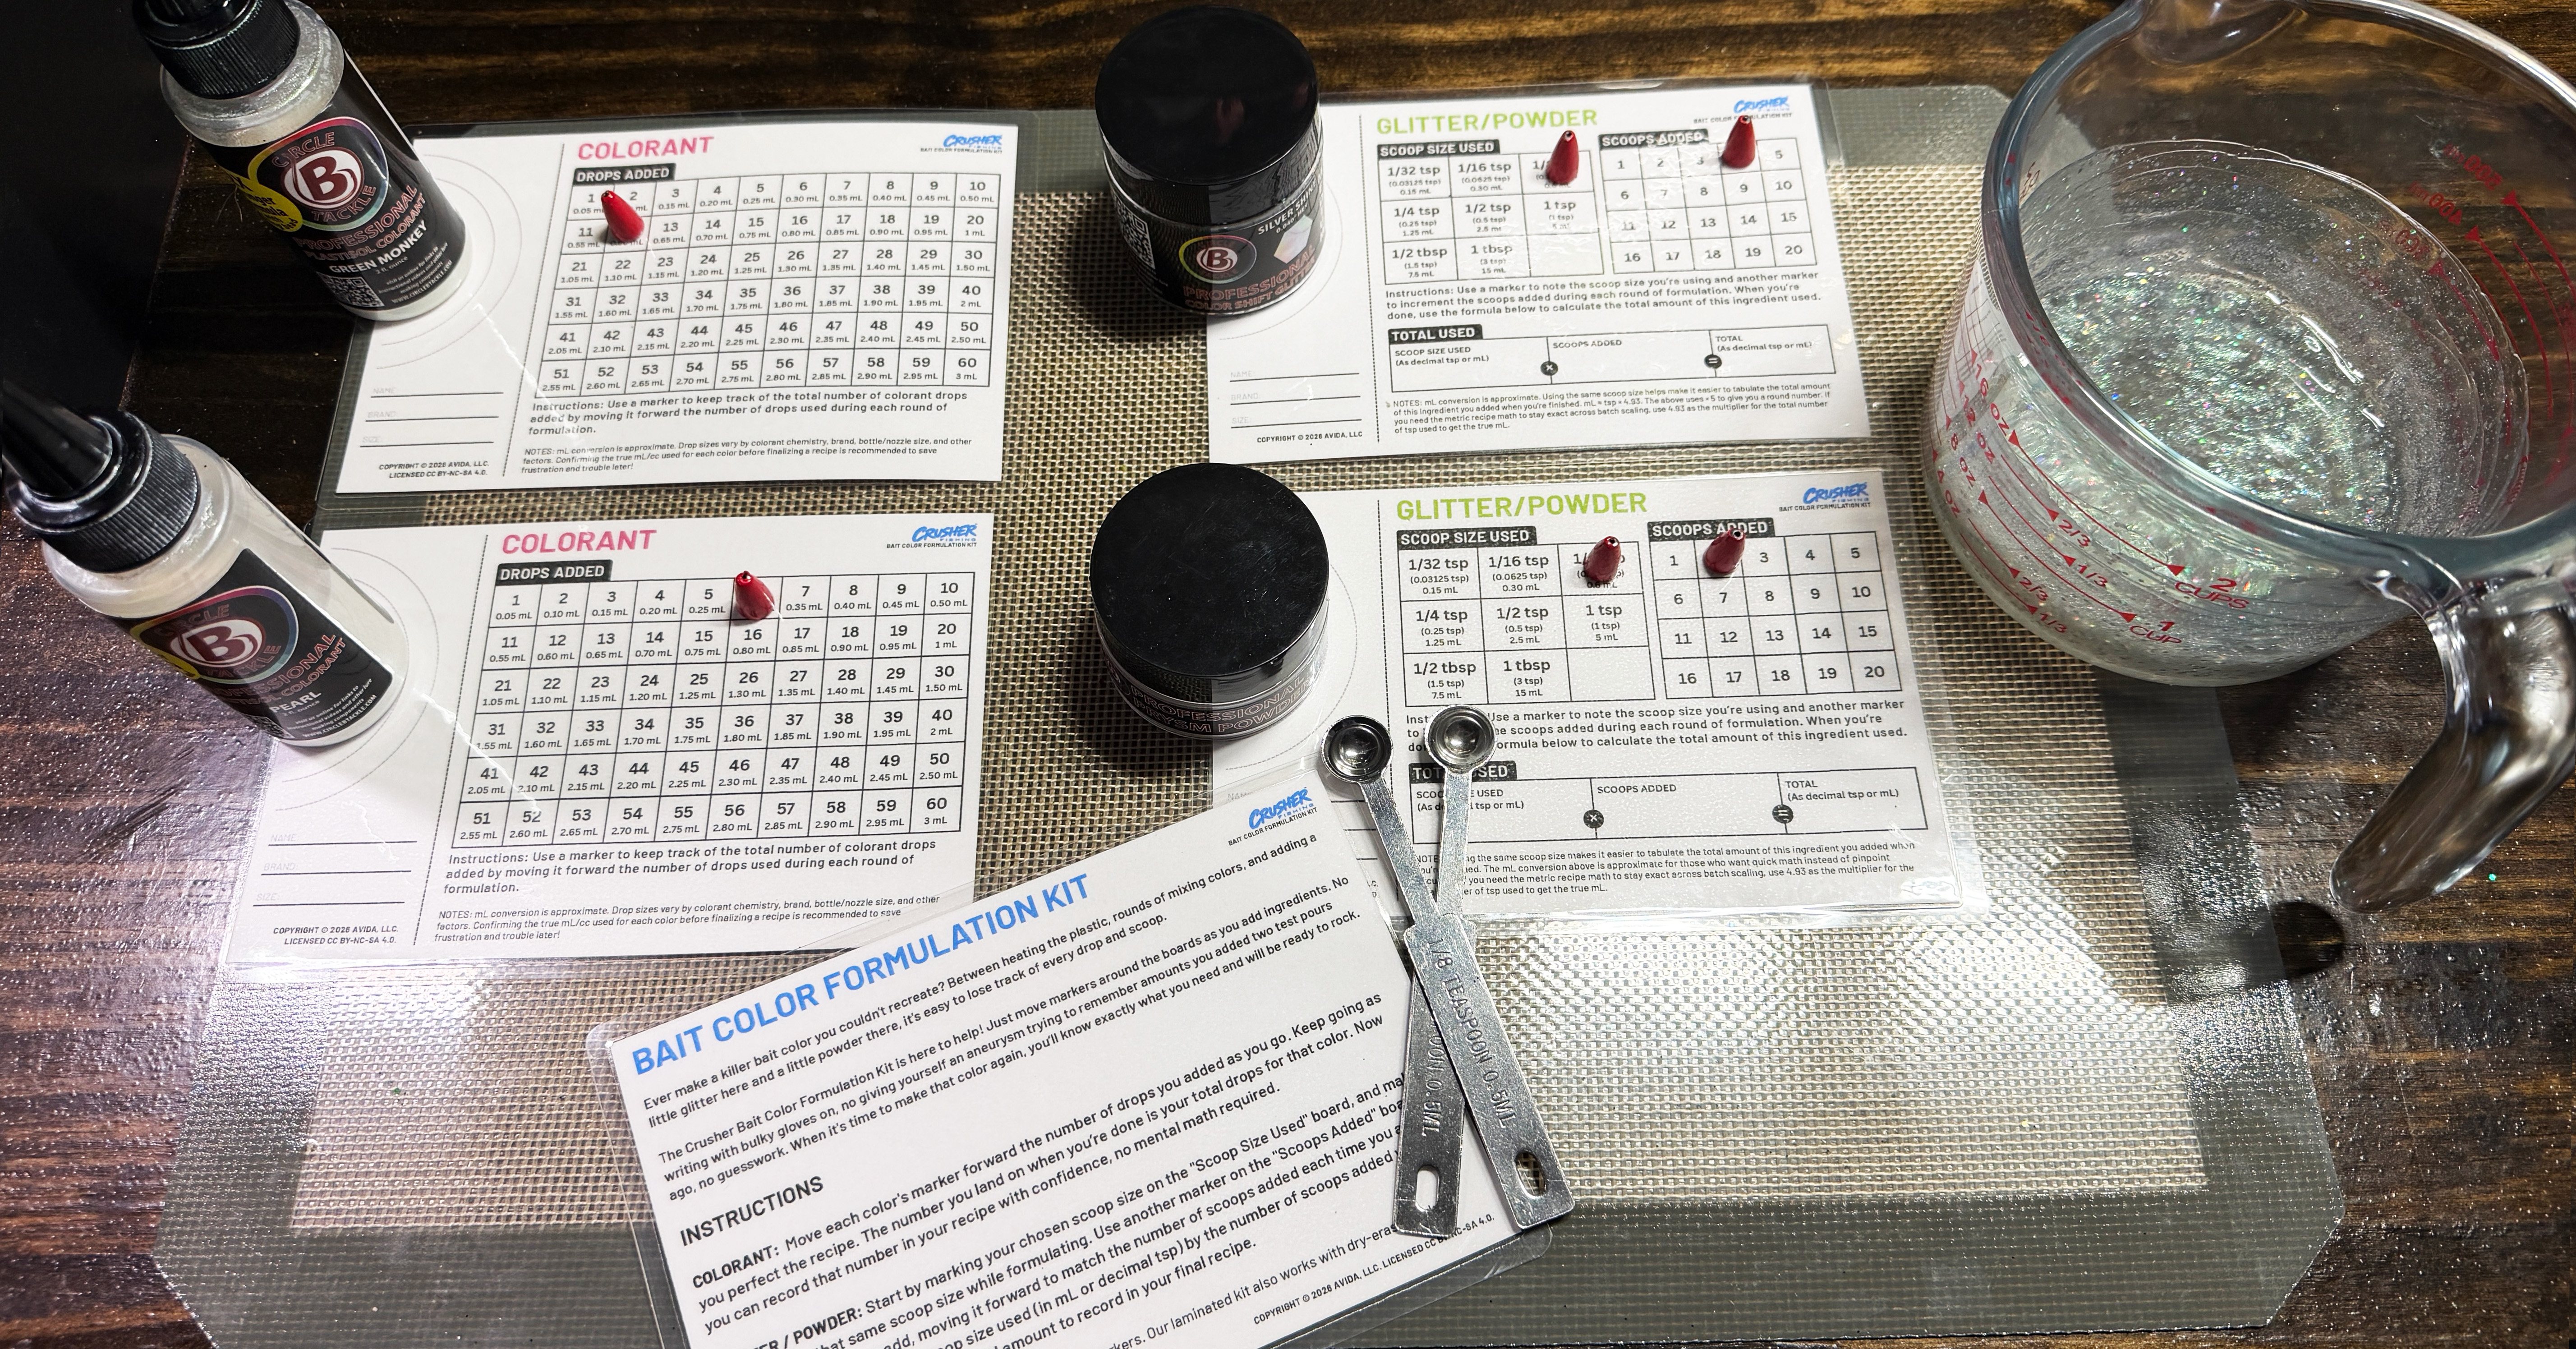
Ever create a killer bait color, only to try making it again later and completely fail? I sure have, maybe 20 times, and man… it sucks. Between juggling hot plastic, tweaking colors, throwing cups in and out of the microwave for 30-second reheats, adding a little glitter here and a little powder there, and dealing with whatever other chaos pops up, keeping track of every drop and scoop is near impossible. Stopping to write things down with bulky gloves on isn’t exactly convenient either.
From natural shrimp to natural disaster
The recipe that finally broke me was natural shrimp. Simple, plain, natural shrimp. Or so I thought.
I spent a good hour getting it exactly how I wanted it. A few drops of this, a few more of that, some glitter, a test pour, adjust, another test pour, swearing to myself along the way, “Added 2 more drops of black. I’ll definitely remember that.” Well, I did not remember that.
I loved what I’d finally come up with. You could have thrown it in a bait cooler with 20 live shrimp, and it would have fit right in and looked more real than the real thing. The problem was, when I went back the next day to mix up a real production batch from my notes, what came out of the mold looked a lot more like a natural mud stick than natural shrimp. What I’d “remembered” (I use the term lightly here) and written down afterward was, apparently, completely wrong. The color I was so stoked about the day before was vapor, and in its place was a total disaster. Bummer.
So I made something to make sure that doesn’t happen again. I’ve been using it for a few weeks now, and I’ve gotten it to a point where I’m ready to share it with other bait makers, to hopefully make their lives a little easier.
Introducing the Bait Color Formulation Kit
The Crusher Bait Color Formulation Kit makes tracking your ingredients about as easy as playing a simple board game. Instead of stopping to write stuff down, or keeping a running count in your head while you work out a recipe, you just move a marker on a board each time you add an ingredient. No mental math, no trying to remember what went into that perfect batch two test pours ago, and no fumbling for a pen every time you set down a bottle of colorant or a jar of glitter. You focus on the color, and the boards keep the count, with markers that are easy to scoot around even with gloves on.
The kit is just three pages, each the size of a 6 × 4 inch index card, so they fit right into a tight workspace alongside your ingredients:
- Instructions. A quick how-to card, for reference.
- A colorant card with a “Drops Added” board. Counts up to 60 drops of any given color, with an approximate mL amount under each number. Use one card per colorant.
- A glitter and powder card with two boards. Tracks the scoop size you’re using per ingredient and how many scoops you add (up to 20), with a spot underneath to work out the total. Use one card per glitter or powder.
Each card has lines for the ingredient’s name, brand, and size, so when you’re done, every count is tied to the right bottle or jar. Set the colorant bottle or glitter jar on the circle on the left side of its card, and everything for that ingredient stays right there together.
How to use the kit
Colorants
Give each colorant you’re using its own card. Set the bottle on or near the circle on the left side, and before you start, optionally write its name, brand, and size on the lines below for reference. Put a marker on the card so it’s ready to go (I like to use 1/8 oz bullet weights that stay put on the card and are easy to pick up and move with gloves on). As you add drops, move that marker forward on the “Drops Added” board by the number of drops you added. Keep moving it as you fine-tune the color. When you’re done, each marker sits on the total drops used for that colorant. Record those totals in your recipe and you’re ready to make it again.
Glitter/powder
Give each glitter or powder its own card. Set the jar on or near the circle on the left side, and before you start, optionally write its name, brand, and size on the lines below for reference. Pick a scoop size and mark it on the “Scoop Size Used” board. Use that same scoop the whole time you’re formulating.
Each time you add glitter or powder, move a second marker forward on the “Scoops Added” board to track how many scoops you’ve used.
When you’re done, multiply your scoop size by the number of scoops. That’s the amount that goes in your recipe. For example, a 1/8 tsp scoop added 3 times is 3/8 tsp (0.375 tsp).
Print and assemble it yourself, or buy it ready-made
Print the kit yourself for free, or skip the printing and cutting and get a laminated kit made by my daughter. This is her part-time job!

Your printer makes it
Basic printable kit
Free PDF download
- All three cards: instructions, colorant, and glitter/powder
- Print as many as you need, whenever you need them
- Downside: Use up your own paper and ink, have to cut out the cards yourself
- Downside: Not reusable, more work
- Downside: Sad daughter

My daughter makes it
Premium laminated kit
$25 Free shipping to your door
- 6 colorant cards, 6 glitter/powder cards, and an instructions card
- Super durable 5 mil lamination
- Reusable, no need to ever print more
- Less mess. Dry-erase markers, colorant, and glitter wipe right off
- Happy daughter
Printing your own
- Download the PDF with the button above and open it in any PDF viewer.
- Print it. Each page is a 6 × 4 inch card. If your printer takes 4 × 6 index or photo cards, print right onto those. For best results, set the print size to 96% to 100% (it depends on your printer). On regular paper, you can print at actual size and trim, print two cards per page, or choose “Fit to page” for bigger boards with bigger squares for your markers.
- Print one card per ingredient. Three colorants in your recipe? Print three colorant cards. Two glitters and a powder? Print three glitter/powder cards. You may want to print a few extras to have on hand so you’re never short mid-pour.
This is the first version (v0.1). If something’s confusing, or if there’s something you think would be worth adding, tell us. And when the kit helps you land on a color you love, let us know! We’d love to see pictures of it in use and the creations it helped you make.
We hope this helps you craft some killer colors that crush it.
Now go make some bait!
-Dameian